Organizing and Annotating Tests
- How to group tests into sets for running depending on platform and scenario
- How to use tags for filtering tests
- How to add metadata for reports and debugging
Introduction
As a project grows, the classic describe/it structure becomes insufficient: hundreds of tests need to be run selectively in different browsers, grouped by functional areas, distributed across CI/CD jobs, and managed for flakiness. To solve these problems, Testplane offers sets (grouping tests by files and browsers), tags (marking tests for filtering), metadata (arbitrary data for reports), and integration with GUI/HTML-reporter for visualization and interactive work with results.
Splitting Tests into Sets
A set is a named group of tests that defines which files to run and in which browsers. This is the main tool for separating tests by environments and usage scenarios.
Sets are described in the sets section of the configuration file. If sets are not specified, Testplane looks for tests in the testplane/ folder.
For each set, you can specify parameters:
files(required) — path or array of paths to test files (supports glob patterns)browsers— array of browser identifiers for running tests of this set (all from configuration by default)ignoreFiles— array of patterns to exclude files from the set (e.g., WIP tests)
import type { ConfigInput } from "testplane";

export default {
    sets: {
        desktop: {
            files: "tests/desktop/**/*.test.ts",
            ignoreFiles: ["tests/desktop/**/*.wip.ts"],
            browsers: ["chrome", "firefox", "safari"],
        },
        mobile: {
            files: "tests/mobile/**/*.test.ts",
            browsers: ["iphone", "android"],
        },
        all: {
            files: "tests/**/*.test.ts",
            // browsers not specified — all browsers from config.browsers are used
        },
    },
    // ...
} satisfies ConfigInput;
Running from Command Line
# Run all desktop tests
npx testplane --set desktop

# Run multiple sets simultaneously
npx testplane --set desktop --set mobile

# Run desktop tests only in chrome
npx testplane --set desktop --browser chrome

# Run tests by pattern from set in specific browser
npx testplane --set desktop --browser chrome --grep "payment"

# Without specifying a set, all tests from all sets will run
npx testplane
Split tests by features (one file — one function). This allows you to flexibly combine files in different sets and avoid huge files with thousands of lines.
Sets from the Testplane configuration file are not displayed in the GUI html-reporter, as they are a test execution mechanism, not part of the test results.
Using Tags
A tag is a string label that can be assigned to a test or group of tests. Tags allow filtering tests at runtime regardless of their location in the file system or describe/it structure.
Static Tags
Tags are set in test or suite options as the second argument in the tag field. All tests inside a suite inherit the tag assigned to the suite.
describe("Search", { tag: "search" }, function () {
    it("Opening search", async ({ browser }) => {
        // tag: search
    });

    it("Performing search", { tag: "smoke" }, async ({ browser }) => {
        // tags: search, smoke
    });

    it("Filtering search results", { tag: ["smoke", "critical"] }, async ({ browser }) => {
        // tags: search, smoke, critical
    });
});
Dynamic Tags
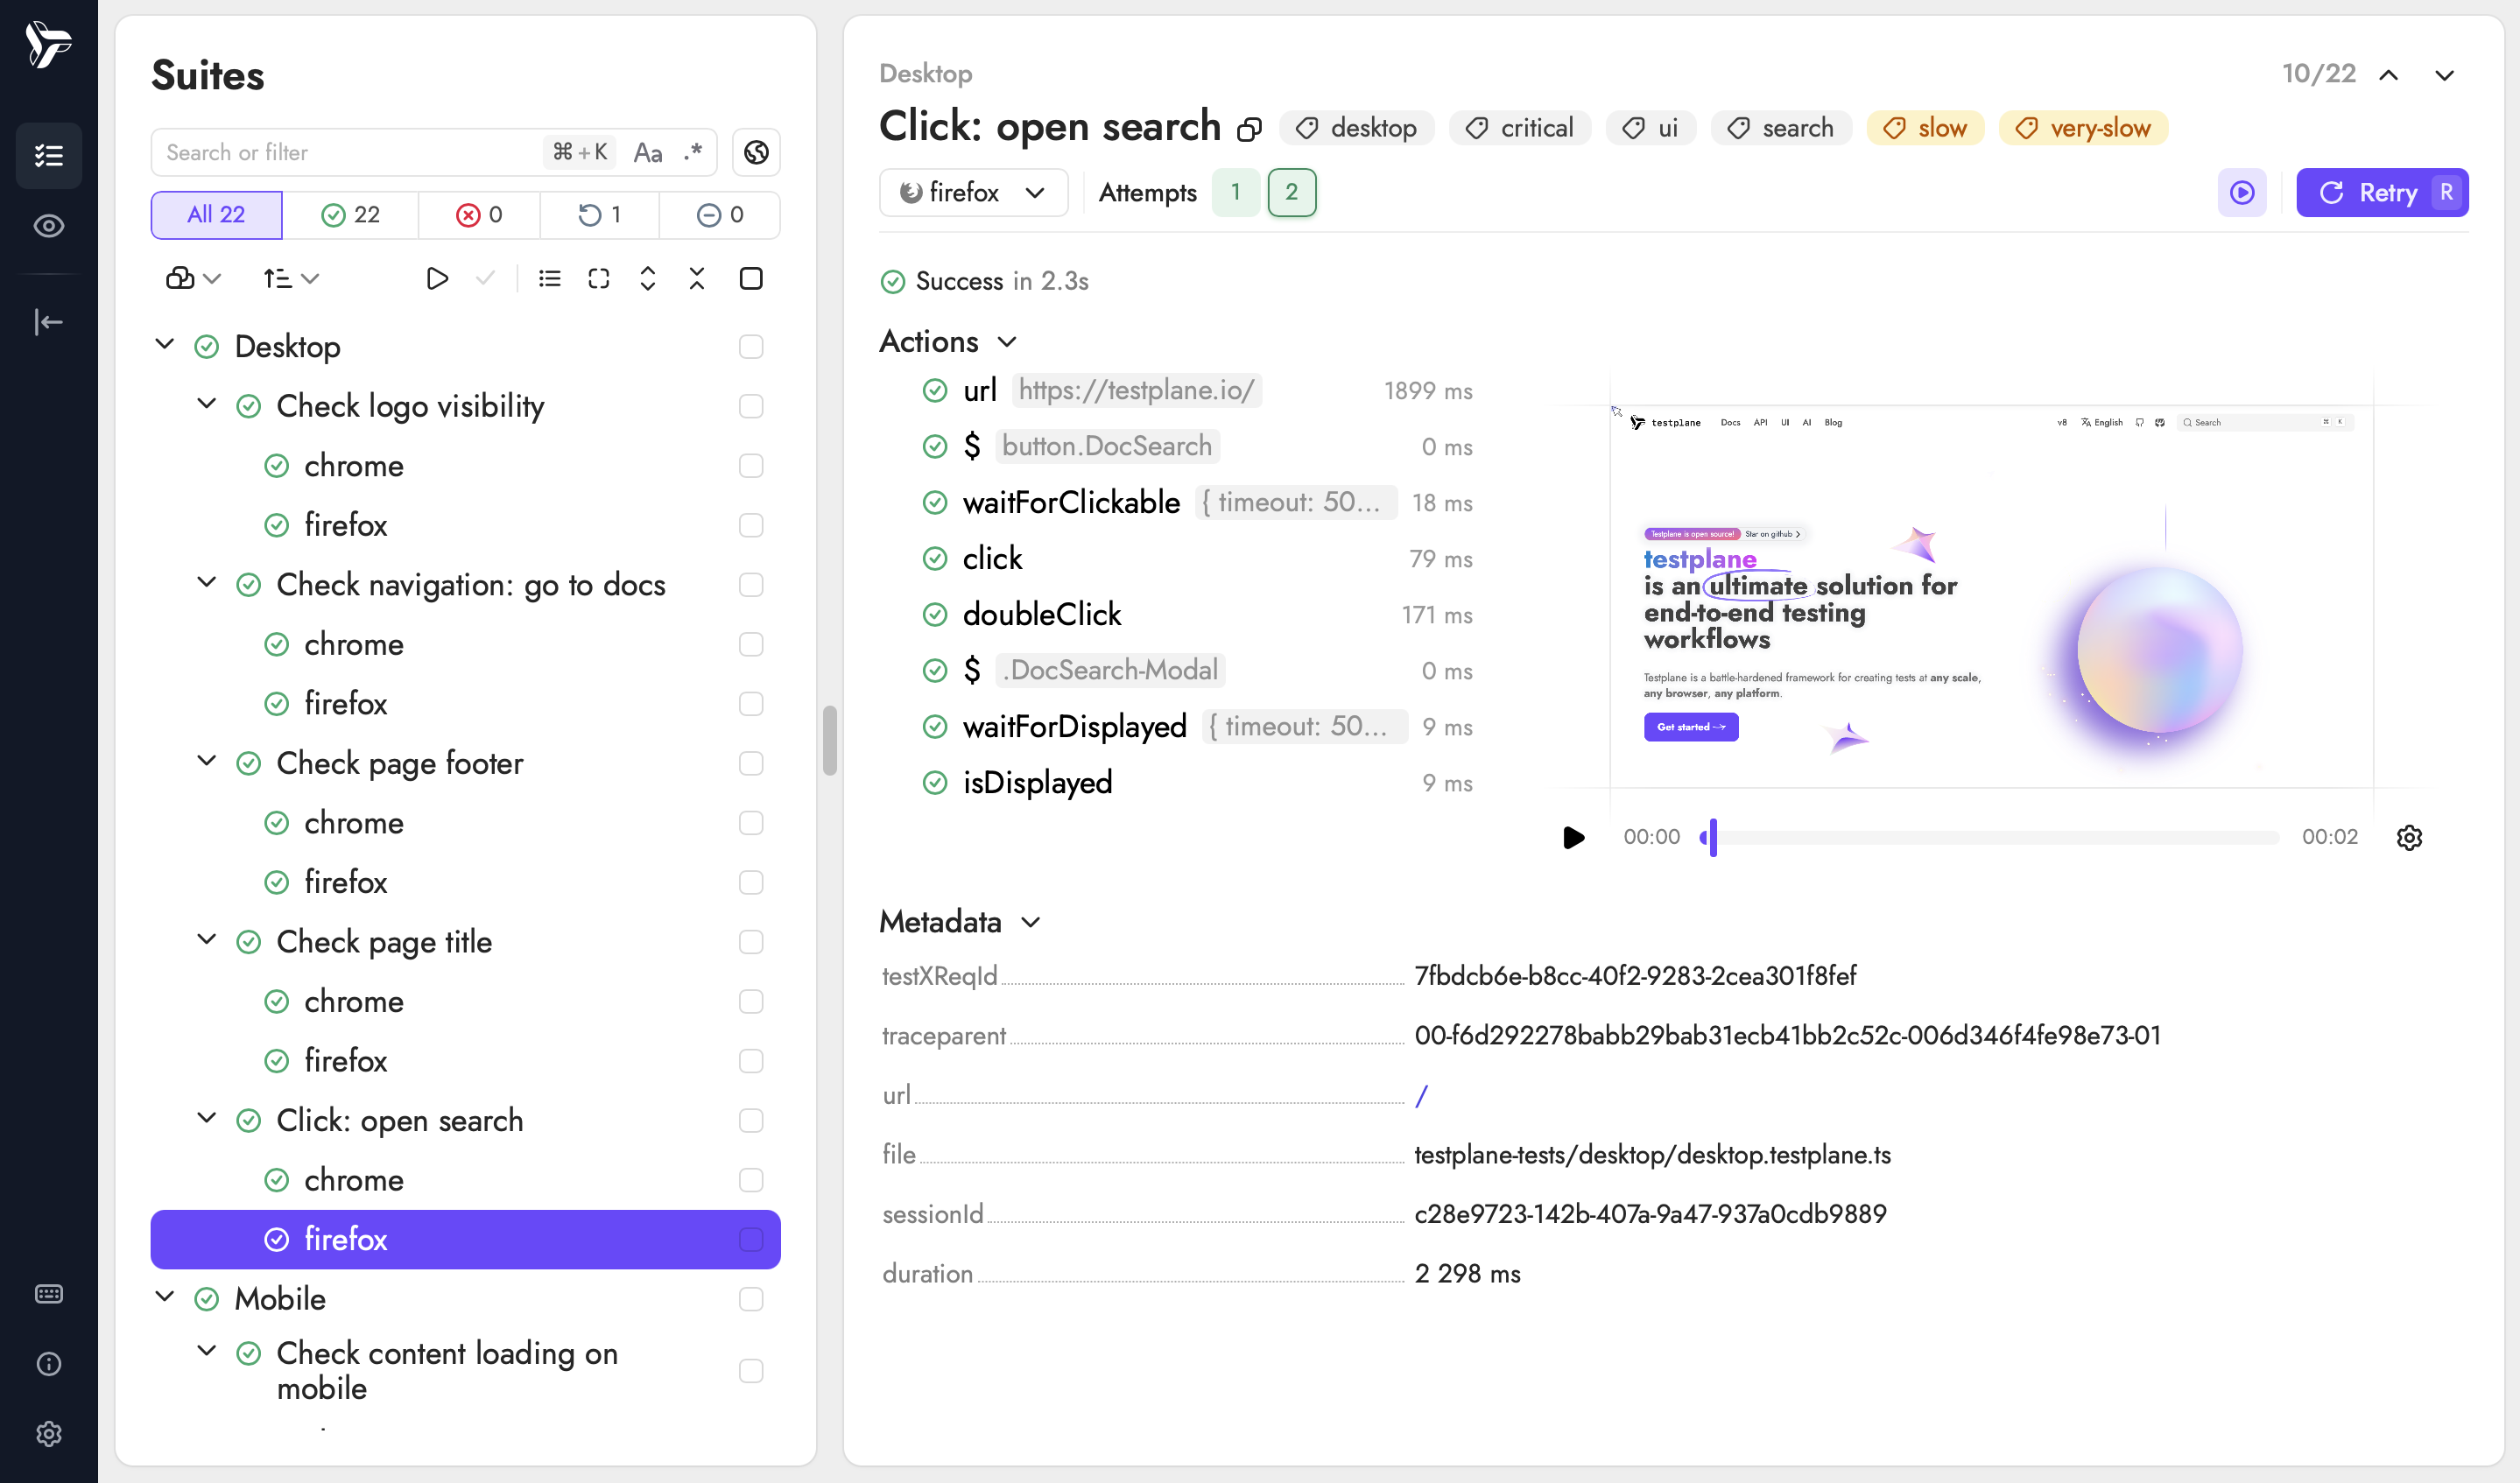
Static tags are set before execution and describe the nature of the test. But some properties become known only during or after execution. For such cases, there is the browser.addTag() method, which adds a tag to an already running test, and the tag is saved to the report.
A typical scenario is automatic marking of slow tests:
it("Click: open search", { tag: ["critical", "ui", "search"] }, async ({ browser }) => {
    const startTime = Date.now();

    await browser.url("https://testplane.io/");

    // ...

    const duration = Date.now() - startTime;
    if (duration > 1000) {
        await browser.addTag("slow");
    }
    if (duration > 2000) {
        await browser.addTag("very-slow");
    }
});
After the run, the test will be marked in the report with slow and very-slow tags: you can filter results by them and decide whether to move the test to a separate set with lower run frequency.
Running from Command Line
# Run only tests with the smoke tag
npx testplane --tag smoke

# Run tests with the smoke OR critical tag
npx testplane --tag "smoke|critical"

# Run tests with the smoke AND auth tags
npx testplane --tag "smoke&auth"

# Exclude tests with the slow tag
npx testplane --tag "!slow"

# Smoke tests only on mobile browsers
npx testplane --set mobile --tag smoke
Tags in GUI
In html-reporter, tags are visible in the test card. You can filter and search by them, for example, find all failed critical tests. Dynamic tags are visually different from static ones.
Working with Metadata
Metadata is an arbitrary set of keys and values that can be attached to a test. Unlike tags, metadata is not used for filtering at runtime: it is intended for debugging and analytics, so that from the run results it is clear in what context the test was executed.
Two methods are used for writing and reading metadata:
browser.setMeta(key, value)— saves a value under the specified keybrowser.getMeta(key?)— returns the value by key. If no key is specified, returns the entire metadata object.
The most common use case for metadata is saving a link to a ticket:
it("Check search functionality", async ({ browser }) => {
    await browser.setMeta("issue", "TICKET-123");

    await browser.url("https://testplane.io/");

    const issue = await browser.getMeta("issue");

    const meta = await browser.getMeta();
});
In the configuration file, you can set metadata for all tests of a browser:
import type { ConfigInput } from "testplane";

export default {
    browsers: {
        chrome: {
            meta: {
                platform: "desktop",
            },
        },
        "chrome-mobile": {
            meta: {
                platform: "mobile",
            },
        },
    },
    // ...
} satisfies ConfigInput;
The url key is filled automatically by Testplane: it stores the page address where the browser was at the moment the test finished.
it("tracks URL", async ({ browser }) => {
    await browser.url("/foo/bar?baz=qux");

    const url = await browser.getMeta("url");
    console.log(url); // '/foo/bar?baz=qux'
});
Metadata in GUI
Test metadata is displayed in the result card in the Metadata section:
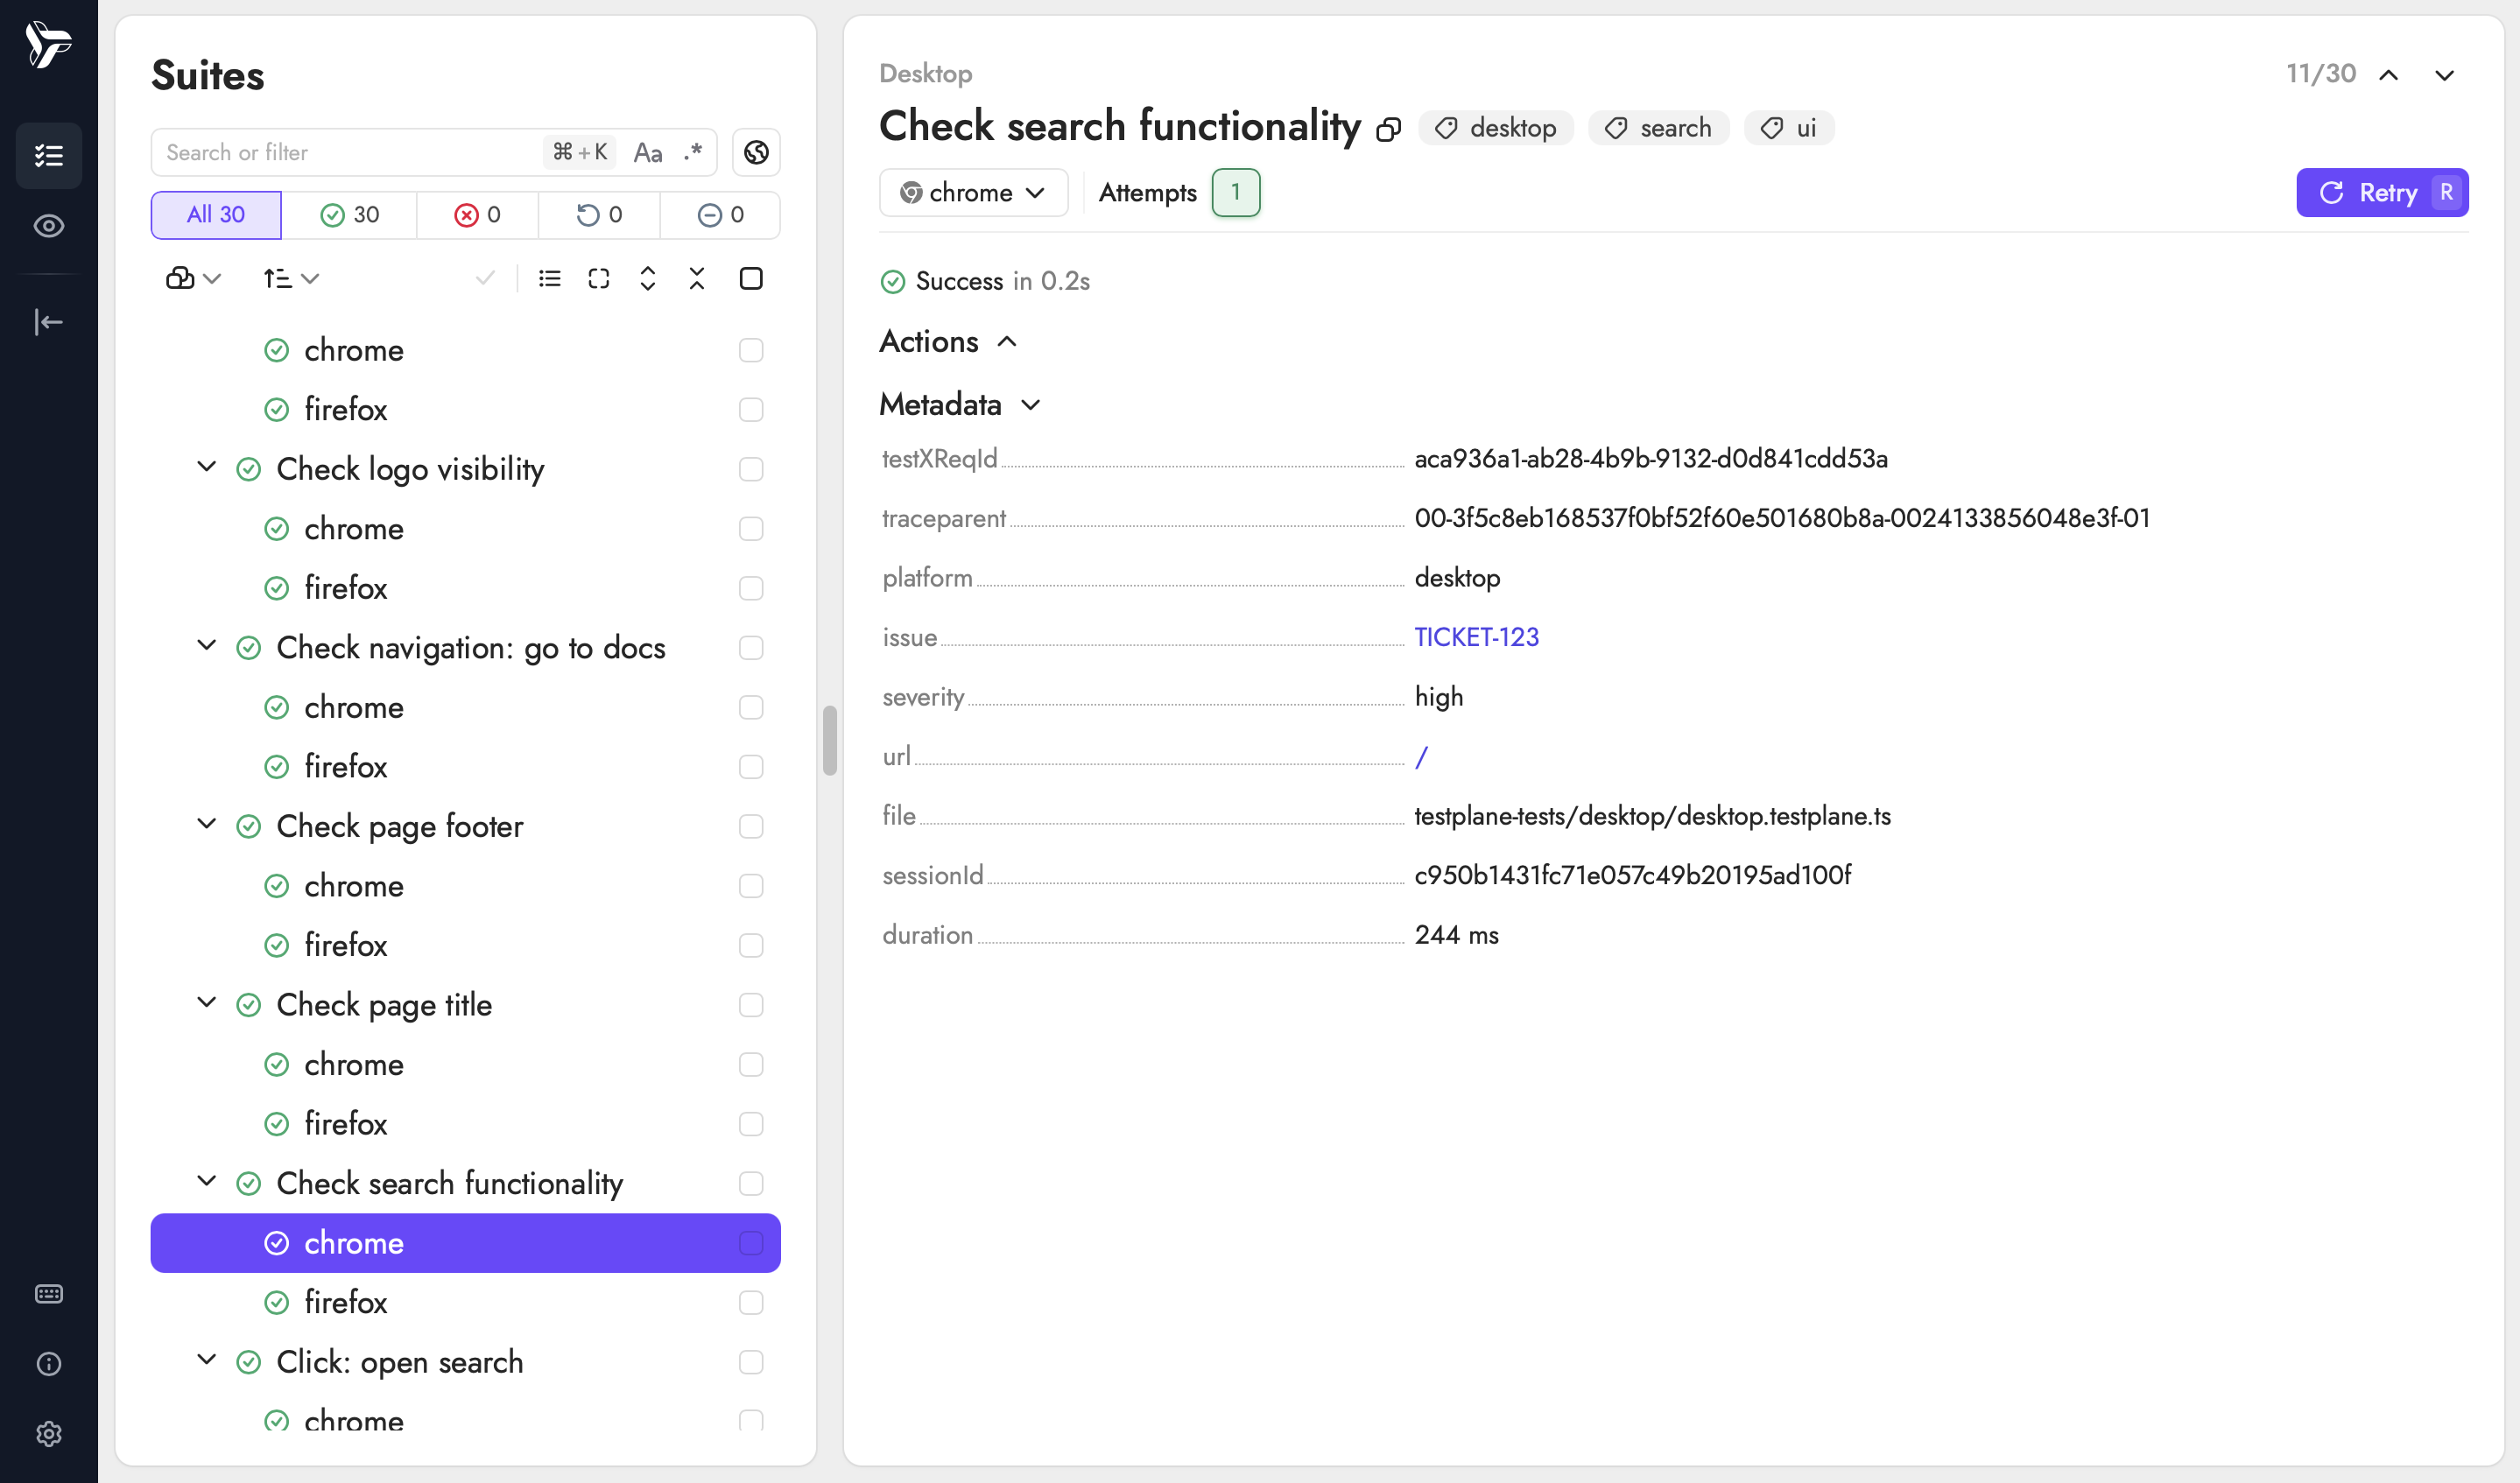
If you need values in the Metadata section to be displayed as clickable links, configure metaInfoBaseUrls in the HTML reporter config:
export default {
    plugins: {
        "html-reporter/testplane": {
            metaInfoBaseUrls: {
                // The "issue" key will be displayed as a link:
                // https://tracker.company.com/TICKET-123
                issue: "https://tracker.company.com/",
            },
        },
    },
};